Wednesday, 13 March 2024

Reflection


This term was extremely demanding and exhausting for me. Due to the large amount of written work that I have trouble with and I don't like, I fell behind on all my projects. Because I didn't know how to deal with it, procrastination crept into my life.
I have to avoid this at all costs next semester because next time I might not be able to cope with the load of material. This is a valuable lesson for me for the future, from which I hope I will draw conclusions and not make the same mistakes again. 
However, I cannot be satisfied with my work this semester because I did not do it properly. I did all the projects at the last minute, which increased stress.

Object Lesson

One of the tasks that develop creativity is Object Lesson. It involves selecting an object and developing the idea. Since I received clay from my lecturer, I decided to make something creative with it.


It is used to make sculptures that I associate mainly with ancient Greece and Rome.
Creators such as Myron are famous to this day for their excellent craftsmanship and the ability to reproduce the body in the smallest details.


Another achievement of the ancient Greeks is theater and the creation of the first plays. I decided to combine these two issues and make a theater mask with the clay I got.


Unfortunately, unlike Myron, I don't have much talent, so my sculpture looks very bad. Despite my best efforts, I don't have the skills and the results of my work are poor.


However, this exercise was not about execution, but about creative thinking and creating something unique. I wanted to combine two great achievements of ancient culture to pay tribute to their achievements.


The Final Book

After an extremely demanding assignment, I finished my book. Even though it's not the best novel in the world, I'm proud of myself because I put a lot of work into it.


I will now add it to the website so that everyone can find it there.


Website Gallery: Photographic Project

 In today's post I will describe how I added photos to the gallery on the website.

First, I went to the main menu and added a new blank page.


Then I included it as a subpage of my portfolio.


Later, in the main menu, I found the add gallery option and selected the one that met my requirements.


Since my photos are black and white, I decided to leave the background black so as not to contrast too much with them.

I then added buttons to connect the portfolio page to the project and vice versa. Later I changed their color and adapted it to the scheme I had previously used.


Then I changed the photos in the gallery from examples to photos I took for my project.  
And I wrote the titles of the photos.


Finally, I checked the website was working properly and there were any problems with the mobile view. 
Everything was fine so I left it.


Website Gallery: Book

 Today i will add book to my webpage. 

First I had to go to the main menu and add a new page. Later I included it as a portfolio subpage. Then i changed the name of this page to Mines of Mars.


Then I added a button connecting the project page to the portfolio page and vice versa. Later I customized its font and appearance.


Finally, I took care of the appearance of the subpage with my project. First I changed the background. I used a free photo I found on the Internet for this purpose. Then I added a text field in which I placed a short description of the book.


Finally, I linked the photos on the website to my book, so that anyone who clicks on the image will be directed to the book.


Finally, I checked the website preview and mobile view and everything worked fine.

I also changed the date next to the trademark to 2024.

Canva: Chapbook Creation Process

After finishing the last chapter of my book, I went to canva.com to add the cover, table of contents, title page and back cover. For this I had to register and enter Book Cover in the search engine.


Then I selected the cover I was interested in and clicked on it. 
Later I started adapting it to my needs by clicking on customise this template.


Then I inserted a previously prepared cover and AI-generated photos. I also included the text of a book I wrote.


Then I clicked the shere button and selected the more option.


Then I chose the Simplebooklet flip option.


At the end I had to select all the pages and Create a Flipbook.


Chapbook: Chapter Two and Three

After writing the last two chapters, I decided to share them on the blog. Below I have included a fragment of one of my favorite films which partly inspired me.


Below is a link to the last two chapters. I'll probably keep changing them and working on them.

Chapbook: First and Second Chapter


I created the first and second paragraphs of my book, which is part of my final assignment this term.


My book will be about an independent mining colony on Mars and the story of a boy who decided to move in search of a better life. 
It is a sci-fi novel set in a future taken over by large corporations. 

I am completing these on Googledrive, link below.

Chapter 1&2

People at Work: Second Shoot

Since the first session was not very successful, I had to repeat it. For this purpose, I went to the center of Leicester again and asked people in nearby places if they would help me. The vast majority refused, but there were people who agreed to let me photograph them. I think it turned out much better. Below I present the results of my work.


I took all the photos posted above in high-quality jpeg format.

Since these are portraits, I focused on individuals. Below is an example.


 F.2.8, ISO 200,  exp compensation 0,  FL 50mm, Shutter speed 1/80

This is one of the photos that I will include in my project. Perhaps I should have lightened them up a bit, but I think it turned out quite well.

Sunday, 10 March 2024

Book cover Creation: Photoshop

 Today I'm creating book cover. I will use photoshop to do that.

First I create a canvas. To do that i had to choose File in head menu and click new. Next i choose Print and A4 size. Then I clicked on Viw All Presset+. Next I at that point chose the introduction of 'portrait' and checked the determination which was 300 ppi, as I needed tall quality for print. I at that point chose the colour of my foundation, I chose white as I likely will fill the page with an picture.


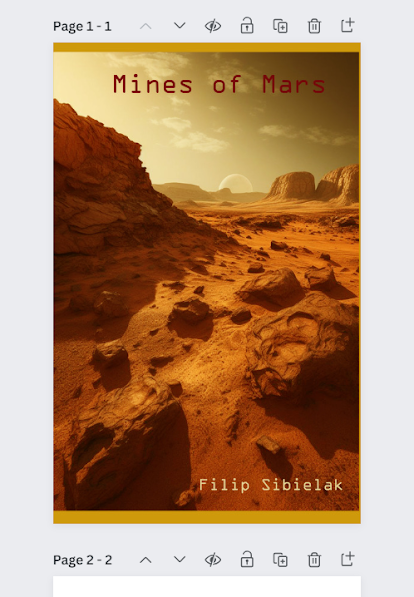
After that i had to find picture which i will use on my front cover. I choose mars landscape on Pinterest and download it. Then i had to click on file and choose Open. I found free download picture and upload it. I had to adjust colors. 


I at that point went to choose within the beat menu and Select 'All' and after that I went Alter the beat menu and 'Copy'. I at that point went back to my unique canvas and clicked on Alter and the 'paste'. I at that point utilized my move instrument and change controls that I clicked on the lower beat menu as they showed up as I clicked on the move instrument. I at that point changed my picture to fill the canvas. I needed my front cover to fill the page.


Next i add the title to the cover, I did this by clicking on T within the devices menu on the left-hand side. I at that point clicked on my canvas and all my text tools were presently within the best menu so I changed the title and changed the colour , I chose this by clicking on the colour palette choosing this within the pop-up box and after that clicking 'ok'. I at that point utilized the move apparatus within the cleared out hand menu and put the title and creator title within the right positions and lined these up utilizing the gridlines.


In the end, I saved the work on my desktop by clicking on File in the top menu and then 'Save As' in JPEG format.

Below is the finished work.


Alfred Eisenstaedt- V-J Day in Times Square'

One of the most famous photos of the twentieth century is Alfred Eisenstaedt's image titled "V-J Day in Times Square". "...